Before I start my calendars, I had search many images. This are the few image that I found out is more suitable for my calendar theme, disaster on Japan.

these are the images used in the process

Step 1: First I select an image by going to: File> Open…, or Ctrl+O to place the image of Fuji Mount as the symbol of Japan.

Step 2: Double click on the background image to unlock it. And change the name into Fuji mount.

Step 3: Change the Document Size to A4 size 29.7cm*21.0cm, Resolution to 300pixels /inch by going to: Image> Image Size, or Alt+Ctrl+I

Step 4: Add a layer mask (1). Then use brush tool (2), quick selection tool (3), and polygonal lasso tool (4) to delete the unwanted part into transparence.

Step 5: Select a new image by repeat step 1. Then click on Arrange document (1)> 2 up. Now, you can see the image of Fuji Mount and the new image of volcano. Click the image of volcano, hold on with the image and then move it to the Fuji mount image.

This image shows the after the step 5, transform from 2 file of image combine into 1 file.

Step 6: Adjust the volcano image (1) by going: Edit> Free Transform, or Ctrl + T. Next, to make the Fuji Mount image become more darker, use the adjustment on the right hand side(2) by clicking: adjustment> Brightness/Contrast. Then
click Alt on the Brightness/Contrast level, so that the adjustment is just for the Fuji Mount image.

This is the adjustment that I had been set.

Step 7: This step is to readjust all the level to make the image fell ‘combine’. I had repeated using the adjustment such like step 6 by clicking: Adjustment > Curve, or Ctrl+M, and Adjustment> level, or Ctrl+L.
During the adjustment, I had use brush tool (1) to erase the part that I do not want to adjust. Select the (1) part and click on brush tool. The color setting of black and white color (3) is very importance. Black color on foreground is to delete the part, while White color on foreground color is to return the delete part. You can see the result of using brush tool at (1).
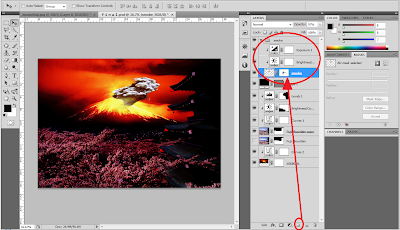
Step 8: Select a new image, name Smoke by repeat step 5. After the Smoke image was added, use adjustment> Brightness/Contras and adjustment>Expose. Next, to make the level become tidier, select Create a new group name smoke. Select all the level that were related with the smoke image and pull it to the smoke file.

Step 9: Create a new group name Fuji Mount by repeating step 8 (1). After finish, I turn opacity into 41% on smoke image (2) to feel more transparency.

This is the final image looks like, disaster (volcano expose) in Japan.
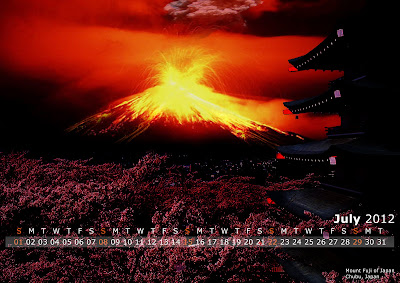
Calendar of July 2012 is finish!
No comments:
Post a Comment