Friday, January 14, 2011

December - Egypt

Image references used for the December calender design.

As usual, open a new document and the size is set to A4. The canvas is then rotated so it becomes a landscape view. Then the pyramid image is placed as the background image. The size and position is adjusted with the Free Transform Tool (ctrl+T).

Duplicate the image into a new layer by pressing ctrl+J and apply photo filter on it. I used a Dark Blue filter with the strength of 100%.

The image of the cyclone is imported in and background is erased with the Eraser Tool (E) with the soft brush selected. Then go to Image>Adjustment>Match Color and select the photo filter layer as the source. This will make the cyclone's color match the background.

Another image of cyclone is imported and the color of the cyclone is matched with the background too.

 By using the clone stamp tool, the cloudy sky is cloned to fill the empty spaces. Making it more realistic as cyclones comes with cloudy and gloomy sky. Clouds are added at the ground level so that it looks like dusts. The clouds are added by selecting an area using the Lasso Tool and then go to Filter>Render>Clouds and the master opacity is lowered.

The cracked floor texture is then imported and resized by using the Free Transform (ctrl+T) and also perspective. The image is duplicated to fully cover the ground. The blending options of these layer are set to Luminosity

Add a new levels adjustment layer and adjusted it to be darker.

The final image after the calender template is inserted.

The making of.... November

These are the image references used in the process of making the November calender..

And now, to the process of the making...

First, Create a new file with the size of A4 and go to image>image rotation>rotata 90degrees. Then import the background image of the Eiffel Tower and press ctrl+T for free transform and adjust it to desired size and position.

Next, by using the Quick Selection Tool (W) I selected the top part of the tower and cropped it out. Next I  selected the sky with the Quick Selection Tool (W) and select inverse by pressing ctrl+shift+I to select the lower part of the tower and the trees. The image selected is duplicated in a new layer by pressing ctrl+J.

The cropped part is placed on a new layer and the position is adjusted as shown in the image by using Free Transform (ctrl+T)..

The sky image is imported and placed under the duplicated lower tower layer. I adjusted the color balance and levels to get a more chaotic and gloomy look for the sky. The lower and upper tower layers' colors are matched with the sky layer by going to Image>Adjustment>Match Color and selecting the sky layer as the source.

The image of the explosion is imported and resized with Free Transform. The unwanted parts and background is erased with the Eraser Tool (E) with a soft brush selected.

The image of the debris is added around the explosion to make it more realistic. The layer is duplicated to get more debris around it.

Finally, the lightning image is added. The background is removed with the eraser tool. The size is adjusted with the Free Transform Tool and in the layer style, outer glow is enabled to gain the light effect. The image is duplicated and placed randomly at the skies.

Finally, this is how the calender looks like after the calender template is inserted =)

Thursday, January 13, 2011

January-Kuala Lumpur(Petronas Twin Tower)Making

This is the making of Calender.
January-Malaysia-Kuala Lumpur(Petronas Twin Tower)


Import the picture i had found it on the website.


 Use the Marquee Tool to select the tower.


After Selected, Remove it and use clone tool and patch tool to cover the empty space.


After hiding the indicated areas with the Patch Tool, this is how the image looks. 


As you see on the picture above, the smooth area must be fixed. We will make it rougher using brushes and a layer mask. Create a Layer mask for the layer. Use the rough brushes in this set on the layer mask using black to reveal parts of the ORIGINAL layer below.


Once I have the bottom part of the building ready, turn off the visibility of the to reveal the ORIGINAL layer. I using Lasso Tool  to trace the contour of the top part of the building. When it done, copy it into a New Layer. I Name this layer as BUILDING-TOP. Select the new created layer and rotate it about 5 degrees.


Now I will start destroying the building. This operation has to be done manually with the Lasso Tool (L). Select the BUILDING-TOP layer and select small size parts of the building. After making a selection right-click and choose Layer Via Cut because you must have these small pieces of debris on a separate layer in order to rotate them. Cut multiple pieces as you see on the image below. I grouped all the layers containing the small pieces of debris.


Once I made the rough look using brushes on the layer mask I used a grunge concrete texture with Overlay Blend Mode to create more damage effect.


After apply the overlay mode.


I using this picture to create more debris effect.


 I apply it into the photo, and adjust scale and position.


Now it’s time to make meteorite.
I create a new layer above the other layers and name it METEORITE. Select the Lasso Tool (L) and draw by hand a roundish shape. Go to Filter>Render>Clouds and then Difference Clouds


After that go Filter>Sketch>Bas Relief. Set Detail to maximum, Smoothness to 2 or 3 and change the different light directions. 


After that, Lets go to layer style, and adjust some effect.


After apply the Layer Style.


Select the Smudge Tool and smudge one end of the rock in order to create a motion effect.


Now I want to create the smoke trail, Open the brush preset editor, adjust the setting like below.


Use the brush tool to create the smoke trail.

I also create different size and different opacity smoke in different layer. It will make the smoke trail more reality. Change the color to orange and brush again at the start and the end of the building.


To create a explosion by using this picture.


Import it and put it nicely, Try to arrange the position and the scale. Change different blending mode and also using soft eraser to erase the photo border.


After the adjustment.


Create the smoke using the same method like stone. Using the Clouds and Blend mode to create a real smoke.


Adjust a bit color and make it more looks like disaster.

Adjust Exposure, Levels , Curves.


Make it more darker.


And this is the Final Artwork of January.


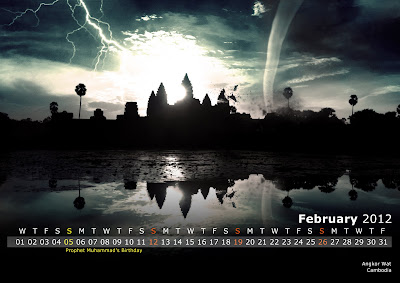
February- Cambodia (Angkor Wat) Making

This is the making of Calender.
February- Cambodia (Angkor Wat) 


Import the picture i had found it on the website.


Combine it together. And adjust the color and brightness. 
Create a mask to hide the background.


Adjust the Levels, Color balance of the photo.


Using the same method to create some debris, I imported it and adjust the Gaussian Blur to it.


After the adjustment.


Use the Marquee Tool to select the tower. And use Lasso Tool Crop out the building.


Now I will start destroying the building. This operation has to be done manually with the Lasso Tool (L). Select the BUILDING-TOP layer and select small size parts of the building. After making a selection right-click and choose Layer Via Cut because you must have these small pieces of debris on a separate layer in order to rotate them. Cut multiple pieces as you see on the image below. I grouped all the layers containing the small pieces of debris.


Also using the same picture to create the debris effect.


I also add in a lightening bolt.


Combine it together. And adjust the color and brightness. 
Create a mask to hide the background. And just leave the lightening.


Copy the above part of the photo, and mirror it to make the reflection.


After the Adjustment. Should be like this.


And this is the Final Artwork of  February.